Since I seem to have found a good pattern that I like, I have decided to try and crochet the pattern in different yarn materials, to see the effects. I've been quite impressed with cotton in the past, so I decided to see how this pattern would look in cotton:
The cotton bag is softer to the touch than the acrylic bag - I would expect it to fade much more quickly, and there is the added drawback of the material decaying (if kept moist for too long) or badly fraying after rough handling. regardless, it is a relatively durable, stylish little bag made out of premium natural material. Since this yarn costs more, and comes in smaller skeins to boot, I'll have to add $2.00 to the finished price of one of these, compared to the acrylic ones. Cotton yarn isn't cheap.
This is another installment in the "Small Drawstring Bag" series. This pattern is one of my own design, and it's performing quite well. These drawstring bags are small enough to hang around one's neck - and are quite convenient for carrying rosaries, prayer beads, malas - and more.
This bag is made out of acrylic yarn, in a camouflage print, with a length of black 550 cord used for a drawstring.
This little "purse bag" was something that came to me when I was brainstorming for more imaginative items for my upcoming store:
As expected, the more jewelry findings, clasps, fringe and decorative beads I have to use, the more it will cost. But these little bags will probably sell around $6-$10...that won't even *bend* a budget, much less break it.
In the future, once I have the patterns perfected, I'll start to offer bags made using tapestry crochet. I've also thought about making some more of those terrific, horrific, eyeball key chains, and offering those for sale as well. In case you've forgotten what they look like:
The eyeballs will probably go for about $10 each, because they're *really* time-consuming. All of those little veins on the surface of the eyeball have to be hand-embroidered!
I have been thinking about stopping the practice of importing these posts as notes on Facebook - because all the comments and/or discussion usually end up on Facebook - not here on blogger, where the most value could be gleaned from it. You don't even need to sign up with blogger to leave a comment.
Thanks, you guys, for reading - please feel free to comment on what you'd like to see in the store!
As I may have mentioned before, I'm thinking of starting a small crochet/art business on etsy this fall. I've been working on experimenting with different techniques to create small drawstring bags that are affordable, relatively simple in design, and can be altered easily for finishing touches, such as decorative beads and clasps. The patterns that I create also have to translate well to different types of yarn.
Here is my first bag:
It's made out of bright red worsted weight yarn using an H hook. It's big enough to fit the palm of my hand – the perfect place for a key, change, lipstick, or a special keepsake. Let your imagination run wild!
I know it's been a while, but here is my latest project:
This purse is piratastic! I'm artistic, so I can just make up words. I'm cool like that. I've done tapestry crochet previously, but never this intense, and never on anything that I would willingly carry around in public. But this...is just all kinds of awesome. The pattern for the handbag is at futuregirl's site: Starling Handbag The skull motif is here, at CraftyCrafty: Jolly Roger Skull and Crossbone I've put a picture of my handbag on the Starling Handbag Flickr Pool - it's great to see what other crocheters out there are creating with the same pattern!
I even have an order in...for one with a red skull, so stay tuned for that one! Also, I have a set of crochet dice to make, as well as a gift for a friend's daughter. I'm *this close* to finishing a hat that I'm going to be donating to a homeless shelter, along with three other hats I've made that never get worn. So - that's what I'm doing these days. Well, that, and managing to get all the REGULAR chores done while unpacking boxes in our NEW HOUSE! Woohoo!
My neighbor liked the two pumpkin bags so much...she had to "order" a couple. With me, "order" consists of her knocking on my door and asking, "How much would you charge to make a pumpkin candy bag?"
Here are my two newest creations:
I tried to make the faces different - just so that each child that gets one has a unique gift.
Hello, blog readers! For this terrific installment, I present to you, my newest creation: PUMPKIN CANDY BAGS!!!
I wanted to make something special for the little boys who live across the hall at my apartment complex. They are well-behaved little munchkins ( 2 and 4 years old, respectively), and I wanted to make something just for them.
To make these bags, I had to alter the Lion Brand pattern, Amigurumi Happy Pumpkin. I think you might have to create an account on the Lion Brand web site to see the pattern, although, looking at the finished results, it's worth it. I stopped doing the pattern after row 14, and continued as follows: 15 - sc in ea sc around 16 - add in Brown, sc in ea sc around. 17 - ch 2, sc in 2nd st from hk. *ch2, sk1, sc in next st* continue working from * to * around. 18 - sc in next st. *1 sc in ch2 sp, sc in next 2sc* (continue from * to *around). sl st in beg sc. Fasten off.
Cord: Sc 90. Weave through loops on pumpkin stem. Tie ends together securely. Make a tassel out of A and B. Attach to cover cord join knot.
There are different ways for making tassels. How do I do it? I start by wrapping the yarn 5 times around the palm of my hand. Hold hand horizontally, with thumb sticking out. start with the yarn end at the bottom of your hand. Wind yarn around your hand 5 times, ending again at the bottom of your hand. Cut end of yarn. Then, cut yarn in half - by cutting through the strands at the bottom of your hand. Do this again with your other color. Fold your yarn strands in half. Lay your cord on top of the yarn strands, below the folded side. Take the cut ends of the yarn, and pass it through the loop made by the folded side, over the top of the cord. Pull the cut ends tight. Voila! There's your tassel! I found that the way I make tassels is called a 'fringe tassel.' Here is a video tutorial at YouTube to show you how:
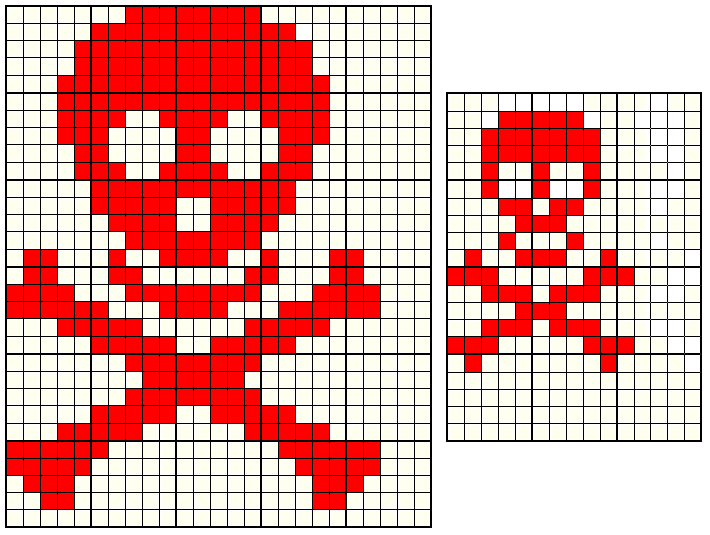
For my birthday, I went to the craft store, and blew the $30 that my grandparents gave me on crafty crap. Among the craft items was this terrific, blank, black tote bag...that I could decorate HOWEVER I WANT. WooHoo! So, I cross-stitched this super awesome skull and crossbones onto it:
I got the pattern for this at supermitten.com. I had a few problems in the beginning stages - mainly, with the waste canvas, which doesn't seem as easy to use as the package (and many cross-stitching websites) would lead you to believe. The combined thickness of the fabric and the waste canvas, as well as the inflexibility of the canvas itself, led to the impossibility of getting the fabric + waste canvas stretched over the damn hoop to make it easier to work with. I ended up abandoning the hoop and the waste canvas, and went for my 14 aida. It was easy enough to apply, the stitches look uniform - and when finished, it actually LOOKS like the pattern. Unfortunately, it was a bitch to remove out from under the stitches. I'll make sure to attempt the waste canvas again - although, I'll definitely have to plan better.
A little off the subject... I really can't figure out what to do with this tote bag. I have a couple ideas: 1. Run with the pirate theme, as I love pirates, and they are awesome and stuff, or 2. Make it an 'Audrey Awesome' tote bag, covered in everything that I love: frogs, Folk Art Hearts, Happy faces, crochet patches/pockets, Peace signs, guns...you know - all the stuff that makes me ME. OR (this just occurred to me) 3. Make a theme on either side (e.g. frogs on one side, pirates on the other)
I love themes, and I'm willing to run with one - but an amalgam of the awesome things that I ♥LOVE♥ really brings out the artist in me!
My tote came out quite a bit bigger than the one in the picture. I might have used a hook that is much bigger than what the author used...although, the instructions only specified "big plastic hook"...with no size listed. This made me a little frustrated, as I like projects to turn out looking like the picture that tempted me into making the project in the first place. I also like detailed, EXACT instructions (especially when it has to do with the materials and supplies needed to complete the project). I was tempted to name this project 'Colossal Waste of Time' - because, more than likely, I'll never use this. I guess the best thing about this bag is that it's made out of plarn...and I can chalk it up as a learning experience and drop it in a recycle bin. I guess satisfaction isn't always guaranteed in crochet. As in life...
This hobo bag was adapted from the pattern in this terrific book:
Kooky Crochet by Linda Kopp
If you're a crocheter, then you need this book in your crochet pattern library.
So - how did I alter it? The pattern in the book was done with polypropylene monofilament support webbing (or, silver duct support strap). With mine, I cut up pairs of old jeans into strips and joined them together, like so: Laughing Purple Goldfish Designs
I wound them into a (VERY HEAVY!) ball and waited for the perfect project to come around. This is a simple pattern, made up of only slip stitches, single crochet, and double crochet. I used a size Q plastic crochet hook. I also didn't make the bag as deep as the pattern said - I think I shaved off 3 rounds.
I imagine that it would also look cool crocheted with 3 strands of yarn instead(adding a strand of eyelash yarn would look really groovy too!) I think I'll save this pattern and attempt it again in the future with different materials. This is a great pattern for a beginner to try out their new skills!
This book is a must for a modern, quirky crocheter - it has some awesome patterns that you can twist to your own unique ends! (Such as an interesting hobo bag - I'll be doing a few versions in the near future).
So - buy it, or check it out from your local library. It's great!
All you need is a two-liter plastic bottle, a single hole punch, and a bit of yarn. I made this for a daughter of a friend of mine for her birthday - she just turned 5! Happy Birthday, Mika!
Here are three bottle gift bags that I made: One for my mom, one for my friend, and the last one for HER mom. They are on bottles of lotion that my husband got free from work. I did take down the pattern while I was crocheting them, and when I have the desire and the time to type it down next week, it will be up here for you to enjoy!
I got the instructions for the crochet cord here (Technique 2) : How to Crochet a Cord The directions are a little bit confusing, so I may do a picture tutorial on my blog on making this cord.
This crochet bag was made out of plarn; yarn made from plastic bags. I got the pattern through Crochet Pattern Central. Oh - here it is! I altered the pattern a bit. I continued to crochet around, adding rounds to rnds 5-7 (I think I ended up doing rounds 5-11 like that, then following the remainder of the pattern). There are quite a few tutorials on how to make plarn, including some stuff on youtube, but be warned - this stuff is hard to work with until you get the hang of it - the results are truly amazing! It stretches to accommodate things that have a weird shape, and it definitely gets the attention of the checkers at the supermarket (and other patrons!). Hope you like!