Showing posts with label free pattern. Show all posts

Tuesday, October 19, 2010

Pumpkin Candy Bags

Hello, blog readers!
For this terrific installment, I present to you, my newest creation:

PUMPKIN CANDY BAGS!!!


Photobucket

I wanted to make something special for the little boys who live across the hall at my apartment complex. They are well-behaved little munchkins ( 2 and 4 years old, respectively), and I wanted to make something just for them.

To make these bags, I had to alter the Lion Brand pattern, Amigurumi Happy Pumpkin. I think you might have to create an account on the Lion Brand web site to see the pattern, although, looking at the finished results, it's worth it.
I stopped doing the pattern after row 14, and continued as follows:
15 - sc in ea sc around
16 - add in Brown, sc in ea sc around.
17 - ch 2, sc in 2nd st from hk. *ch2, sk1, sc in next st* continue working from * to * around.
18 - sc in next st. *1 sc in ch2 sp, sc in next 2sc* (continue from * to *around). sl st in beg sc. Fasten off.

Cord:
Sc 90. Weave through loops on pumpkin stem. Tie ends together securely. Make a tassel out of A and B. Attach to cover cord join knot.

There are different ways for making tassels. How do I do it? I start by wrapping the yarn 5 times around the palm of my hand. Hold hand horizontally, with thumb sticking out. start with the yarn end at the bottom of your hand. Wind yarn around your hand 5 times, ending again at the bottom of your hand. Cut end of yarn. Then, cut yarn in half - by cutting through the strands at the bottom of your hand. Do this again with your other color.
Fold your yarn strands in half. Lay your cord on top of the yarn strands, below the folded side. Take the cut ends of the yarn, and pass it through the loop made by the folded side, over the top of the cord. Pull the cut ends tight. Voila! There's your tassel!
I found that the way I make tassels is called a 'fringe tassel.' Here is a video tutorial at YouTube to show you how:


If you prefer a more precise tassel, I found a terrific tutorial at Laughing Purple Goldfish Designs

Thanks for reading, and I hope you enjoy my pumpkins!

Saturday, October 9, 2010

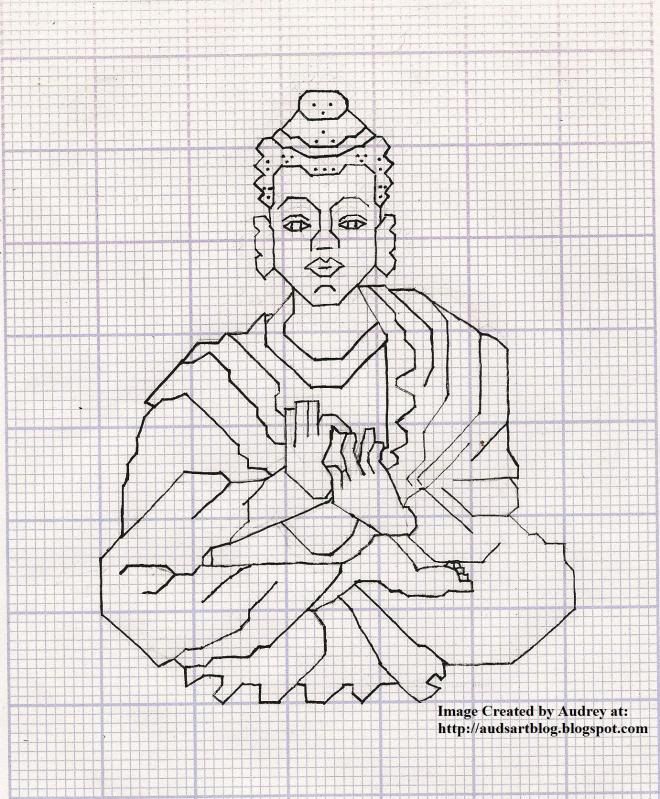
Buddha Cross Stitch Pattern

I was looking around on the internet for a simple, FREE Buddha cross-stitch pattern to do, as a form of mindful meditation. Mindful meditation must be expensive these days, because I looked high and low and couldn't find a simple pattern. Not only could I not find a simple pattern, but I was unable to find a Buddha cross stitch that I didn't have to pay an arm and a leg for. So - I decided to fill this niche. I found a few drawings and pictures of statues, and started to play around and be creative with them. This is the result:
Photobucket

This image is, of course, altered, so as to fit the frames of my blog - I do that with most, if not all of the images that I post here, to offer you, the blog reader, a more pleasant viewing experience. Here is the URL for the original, at Photobucket.

I hope you enjoy this creation - it was fun to make! I have yet to cross-stitch it, but that will be another entry for another day. If YOU find this and cross-stitch it, feel free to link to my blog - I would love to see your finished product!
A Note - if you wish to post this image elsewhere, make sure to give credit where credit is due: attribute it to me! In the spirit of the Dharma, I have decided to make this pattern free; use this anywhere and for whatever purpose you like.
I may, in the future, add color and charge a fee for the colored pattern. But for now...enjoy it as it is.

"Do not dwell in the past, do not dream of the future, concentrate the mind on the present moment." ~Buddha

Tuesday, September 14, 2010

Tapestry Crochet Bone Pattern

Here is my tapestry crochet pattern for a bone, for your crocheting pleasure:

Photobucket

When it's done, it should look something like this:

Photobucket

I designed this bone so that it could be tapestry crocheted onto my dog's kerchief.
I hope you enjoy!

Wednesday, June 30, 2010

Crochet Towel Topper - FREE Pattern!

I've done this pattern many times, without need for an actual pattern. But here it is, free to you, out of the goodness of my heart. Do you feel warm and fuzzy yet? Because you should. :D


Towel Topper
By Audrey D. Custer-Coleman

Materials (makes 2):
H crochet hook
Cotton or acrylic worsted weight yarn
Yarn needle
1 kitchen towel, cut in half width-wise
Large button ( ¾” to 1”)
Scissors

Optional:
Leather punch
Iron-on hem (to hem towel w/o sewing)
Sewing supplies (to sew hem, if needed)

Preparation:
Cut kitchen towel in half width-wise. Hem by sewing, or with iron-on hem if needed. If you don’t know whether to hem it or not, just go ahead and do it – it’s better to be safe than sorry! (I know this from experience – the towel pulling apart when you’re trying to crochet along the edge is NOT fun or convenient!)
With leather punch or scissors, punch an odd number of holes across the width of the towel about ¼” from edge (on a hemmed edge is most stable and much less likely for fabric to unravel.)

Instructions:
Row 1: SC foundation through holes in towel. Ch3, Turn.
Rows 2-4: DC in ea st to end. Ch 3, turn.
Row 5: DC in first st. *1DC, SK1, 1DC*. Repeat from *to* until end is reached. Ch3, Turn.
Row 6: DC in ea DC to end. Ch3, Turn.
Rows 7-10: Repeat rows 5-6 twice more.
Rows 11-16: (strap) DC in ea DC to end. Ch 5, Turn.
For button hole: sl st in turning ch3 to make a loop. Turn. Sc5 over ch 5 loop. Fasten off and weave in ends with a yarn needle.
Add button: sew button to the base of strap, in the middle of Row 9. Secure button. Weave in yarn ends.
Enjoy your towel topper, or give as a gift!