Monday, August 30, 2010

Another Plarn Tote

This is another pattern I got from the book: 'Kooky Crochet' by Linda Kopp

crochet,plarn,tote,bag

My tote came out quite a bit bigger than the one in the picture. I might have used a hook that is much bigger than what the author used...although, the instructions only specified "big plastic hook"...with no size listed. This made me a little frustrated, as I like projects to turn out looking like the picture that tempted me into making the project in the first place.
I also like detailed, EXACT instructions (especially when it has to do with the materials and supplies needed to complete the project). I was tempted to name this project 'Colossal Waste of Time' - because, more than likely, I'll never use this.
I guess the best thing about this bag is that it's made out of plarn...and I can chalk it up as a learning experience and drop it in a recycle bin.
I guess satisfaction isn't always guaranteed in crochet. As in life...

Thursday, August 26, 2010

My 100th post - Tapestry Crochet Heart Square, and Random Rambling

Woohoo! Celebrate - It's my one hundredth post! Feel free to do any of the following: drink a margarita, sing "We Are the Champions", do an intricate "End Zone" dance, or scream "AUDREY IS AWESOME!" at the top of your lungs.
Oh, and all you loyal followers: thanks for hanging in there with me. You're awesome, too!

MEANWHILE, at the crappy one bedroom apartment that temporarily suffices as my living quarters:

Here's a Tapestry Crochet heart square that I did!

tapestry crochet,crochet,heart,square

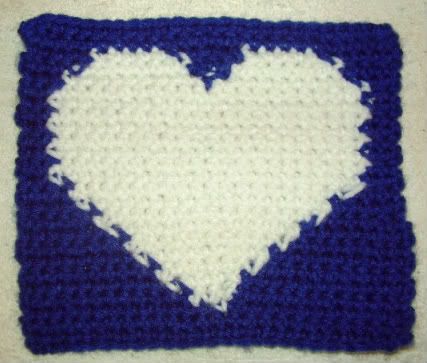
I'm getting quite interested in tapestry crochet, and the myriad methods used to create these terrific works of art. I have found 4 methods so far, and I'm playing with all of them. This heart was done in an afternoon at my mother-in-law's, when I had to stay and watch the dog while my hubby and his brother took their mom out to dinner for some quality time...because it's her 50th birthday! Oh, and if someone didn't watch the dog, he'd howl, bark, and tear off the molding around the door - so that someone had to be me. And also, because I eat gluten free and they were going to a hamburger joint (i.e. Absolutely NOTHING on the menu that I can eat).

Okay...FOCUS! (I'm talking to myself again. Almost as worrisome as going off on tangents. Oh. Right.)
This method required that I attach small balls of yarn at the top of the heart (3 blue, 2 white) instead of carrying the opposite color underneath the working color. You may remember this method from the video that I posted in my previous post, Loki's Tapestry Crochet Kerchief. I think this method looks much more uniform, and the colors are bright and vibrant - not broken up by the color of the carried yarn showing up underneath (as it inevitably does, if you carry the yarn).
All in all, I'm happy with the results. This method might become my standby!

So - what will I do with it? Many ideas have occurred to me, including: a pocket on clothing, a pocket/patch on a bag, the front panel of a sachet bag, a center square for a throw pillow, and a random square to be used in an afghan. That's about as creative as I get at the moment, as I am trying to MASTER A SKILL, rather than complete a project.
If you have any ideas for this square, feel free to leave a comment. Oh, what the hell - you could even just leave a comment if you think it's really awesome, and you have no ideas for it whatsoever. Anything goes on Auð's ArtBlog...I'm a rebel.

Tuesday, August 24, 2010

Loki's Tapestry Crochet Kerchief

This is a kerchief using the same pattern as the previous post, with a little twist: it has a tapestry crochet bone in the middle!

Photobucket

I am finding tapestry crochet to be an interesting and diverse art form, with more than one way of execution. I've discovered 4 methods so far, and I'm experimenting with all of them. With this method, the threads aren't carried - they run along the back of the color change. The back, when flipped over, kind of looks like the back of an embroidery piece, with long stitches of the main color over the design motif. Also, I don't carry the threads to the end of the row, or cut them - I just designate one side the "back" and leave the threads hanging on that side, to pick up when I come around on the next row.
If you've ever been interested in tapestry crochet, I suggest you check out some of the terrific tutorials on youtube. I found this one particularly helpful:


Hope you enjoy! Keep on hooking!

Friday, August 20, 2010

Loki's Blue Kerchief

I call it a kerchief because I like the word kerchief better than bandanna. So sue me!

Photobucket

I got the pattern at Crochet n' More: Dog Bandanna Collar Cover
It slips over the collar...no need to tie, and no need for a clasp! Cool! And Loki looks awfully handsome wearing his new doggy accessory...if I do say so myself.

I made another one, using the Tapestry Crochet Technique. I'll post that one later...I don't want to spoil you guys with too many cool posts in a row.

Thursday, August 19, 2010

Light N' Lofty Cloche

I found the pattern for this terrific cloche at the Coats and Clark website.

Photobucket

It was confusing at first, because I had a hard time seeing the stitches when I crochet in 'Light and Lofty'. To combat this, in the foundation row I crocheted with two strands of yarn - Light n' Lofty, and a strand of regular worsted weight yarn. This way, I could easily identify the stitches. I was tempted to do this around the whole hat, but as it turned out, by the end of the first row, I got into the habit of crocheting by FEEL - so it wasn't really necessary. After I finished, I just cut out the extra strand of yarn in the foundation row.
This project helped me to learn a new skill - it was awkward and unpleasant at first, but I persevered and was rewarded in the end!

Hope you enjoy my new hat...I sure will!

Monday, August 16, 2010

Jumbo Plush 8-Ball

Unfortunately, this one can't tell you the future.


Jumbo Plush 8 Ball by ~audreydc1983 on deviantART

I used the skills I learned at eHowto create this awesome jumbo 8 ball!
I did a few rounds with white, switched to black until the circumference was right, did 7 rounds of sc, and then decreased accordingly (I made it to sc15, inc/dec)
I embroidered the '8' on it when I was about 1/2 way done, and started stuffing when I was about 5 rounds to the end.
The only issue I really had was with the decreases: when you make a crochet decrease, it leaves a slightly bigger hole than when you just sc or increase. I'm willing to take the chance that people really don't care about the back of the darn thing...it's the front that makes it so cool!
It's fun to throw around - or to use as a lumbar support. My husband asked me if I'm gonna make a full set of pool balls - cue stick, and all...I think I've created a monster!

My FIRST gluten-free pie!

This is excluding the pumpkin pie I made last year. I mean...honestly - the filling came out of a can!


My first Gluten Free pie by ~audreydc1983 on deviantART

Earlier that day, I went out and picked blackberries near my apartment building - then I came home, picked all the debris out, washed them (3 times), made the pie crust, mixed the berries with a little flour and some sugar to make the filling, poured in the filling, made the lattice-top, and finally stuffed it in the oven. It took about an hour to cook - and you can't even tell that the pie crust is Gluten Free! For the pie crust, I used Bob's Red Mill Gluten Free All-Purpose Baking Flour.
Joy!

Tuesday, August 10, 2010

Crochet Eyeball!

Hey, all of my fabulously morbid friends! Check this out:


Crochet Eyeball by ~audreydc1983 on deviantART

I used the skills I learned at this crochet ball tutorial as a good basis for my "eyeball".
I had to shorten the number of initial stitches in the round, though. I started off with black, Fastened off, then switched to blue, then fastened off, then switched to white - then I fastened off, about 3 rows from the end of the "ball" I separated the strands of some red yarn and embroidered the "veins" on the white of the eye. I then stuffed it a little with poly-fil, and attached the red yarn. I finished the "ball", and then did a couple decreases to close up the remaining hole...then I made a chain of the appropriate length for the "optic nerve."
Cool, huh? I've been thinking of making a loop in the optic nerve, and attaching it to a key chain ring - these might sell like hotcakes, especially to my morbid friends! :D
I've also been thinking about doing other versions - different colors, different sizes, even different styles: what would you think of one with an elliptical pupil, like a cat's eye?! Cool to think about! But harder to plan... I might just have to cut the elliptical pupil out of felt and attach it when I'm done (or I could just embroider it...ugh).
Hope you get as much a kick out of this as my hubby did: "Don't throw that thing at me! It looks too real!!!" HAHAHA!!!

Monday, August 9, 2010

I've got BALLS!

I've crocheted some fun little balls to play with! I originally crocheted them to assemble into an outer-space type baby mobile for a friend's sister's yet-to-be-born baby (they still may be assembled into one...I haven't decided yet). They work up fast - and the best thing about these balls? You can throw them at your spouse, and they won't leave a mark! MWAHAHAHAHA! :D


Crochet balls by ~audreydc1983 on deviantART

I got the pattern at eHow.

The rainbow one and the blue/yellow/green one were done in variegated yarn. I used my *ahem* AWESOME crochet skills to do the orange/yellow one...in my FIRST tapestry crochet project! Personally, I like how the tapestry one came out...there are less "holes" where the decreases are - because they are mostly filled by the other strand of yarn underneath. Groovy!
I'll let you know - and I'll definitely post it - if I really decide to make that baby mobile.
Thanks for reading...and happy hooking!

Friday, August 6, 2010

Random Crochet Necklace

I was feeling frustrated yesterday, and wanted to create something, instead of destroying things needlessly. So - I got out some scrap yarn and wooden beads, and made this cool necklace:

crochet jewelry necklace beads

It will probably make it's way onto my other blog, Crochet Valkyrie, because it was done on a whim...and it matches nothing I own! There haven't been a lot of posts on there as of late, because I've been quite busy with the business of owning my own home. Once things settle down and I get a larger, more peaceful, less chaotic place to crochet, you'll probably see plenty of action on that one.

Hope you enjoy my random necklace! I'll have to print out a Crochet Valkyrie tag and attach it, so whoever finds it can let me know how much they enjoy it.