I have quite a few things on my list this month, but that list might have to be postponed for this, and possibly next month. My husband and I are buying a house, and the deal is set to close on the 19th of November. So - understandably - posts on my blog will be mighty scarce while I pack, move, and unpack. I hope you all will understand.
Without further ado, here are my lists:
In the works:
1. Gift for Mika
2. Gift for Jeff (my brother-in-law)
3. Finish Granny square blanket
4. Skull and crossbones crochet purse
5. More "hand tools" drawings
My to-do list:
1. Crocheted Autumn leaves magnets
2. Crochet socks
3. Frog Amigurumi
4. Bags for my cousins for Christmas (If I get the color/applique info)
Random Ideas: (I'm taking from my last 'Glimpse' post - which was taken from the last 'Glimpse' post before that. I love some of these ideas, and fully intend on making good on them!)
1. Hammer cozy
2. Small BBQ cozy (our apartment thinks that Charcoal BBQ's are the devil, so I'd like to crochet a cozy to make it more covert)
3. Random street art, to get my 'Crochet Valkyrie' blog up and running again
4. Cross-stitch Buddhism stuff - 4 Noble truths, 5 precepts, 8 fold path
5. Havamal samplers
6. More sushi sets, to sell on Etsy, or wherever I feel like it.
7. Do a felting project!
Again, if there is anything that you'd like to see here, feel free to leave a comment.

Saturday, November 6, 2010


Saturday, October 30, 2010
Terry's Earflap Hat
I've been working on a special hat for my husband lately - something that's warm for the predicted cold winter, and something that covers his ears. Which led me to choose the popular ear flap hat style. Here is is, finished:

This took quite a while, because my husband has a head that's larger than average. It was definitely worth the wait, however...it fit perfectly, and he was thrilled with the results.
He did ask me to make it longer in the back, and I offered a solution: I could make a back panel that attaches with buttons or velcro. That way, it could act as a neck gaiter, and be removable when he finds it annoying (like when he's wearing a hooded sweatshirt with it - all that fabric back there will definitely make your neck warm, but would probably bunch up in the back, creating more of a hassle than a benefit.
He hasn't worn it outside yet, but after a couple minutes inside, his head was starting to sweat.
My work here is done. Kinda.

This took quite a while, because my husband has a head that's larger than average. It was definitely worth the wait, however...it fit perfectly, and he was thrilled with the results.
He did ask me to make it longer in the back, and I offered a solution: I could make a back panel that attaches with buttons or velcro. That way, it could act as a neck gaiter, and be removable when he finds it annoying (like when he's wearing a hooded sweatshirt with it - all that fabric back there will definitely make your neck warm, but would probably bunch up in the back, creating more of a hassle than a benefit.
He hasn't worn it outside yet, but after a couple minutes inside, his head was starting to sweat.
My work here is done. Kinda.
Tuesday, October 26, 2010
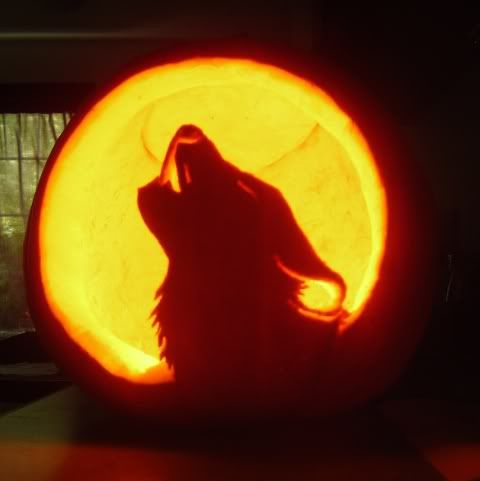
Howling Wolf Carved Pumpkin
I've always wanted to carve a howling wolf into my pumpkin. This year, I decided to finally do it, after I considered and rejected several other pumpkin designs (Among the contenders: Jack Rackham's jolly roger with crossed cutlasses, and a simple, elegant grim reaper). Next year, when we get our own house, I can carve to my heart's content, but living in an apartment has special challenges, namely the lack of space. The wild, roving packs of rabid kids that are native to this area are also an annoyance. They love to steal things, smash things, make noise, etc. I could only imagine what horrible fate will befall my pumpkin when I leave it out on Halloween night while I go to my awesome friend's Halloween party. Oh, well - I guess that's one way to learn impermanence.
Without further ado, here is my fabulous carved pumpkin:
I hope everyone enjoys a safe and Happy Halloween!
Without further ado, here is my fabulous carved pumpkin:

I hope everyone enjoys a safe and Happy Halloween!
Pumpkin Candy Bags (continued)
My neighbor liked the two pumpkin bags so much...she had to "order" a couple. With me, "order" consists of her knocking on my door and asking, "How much would you charge to make a pumpkin candy bag?"
Here are my two newest creations:
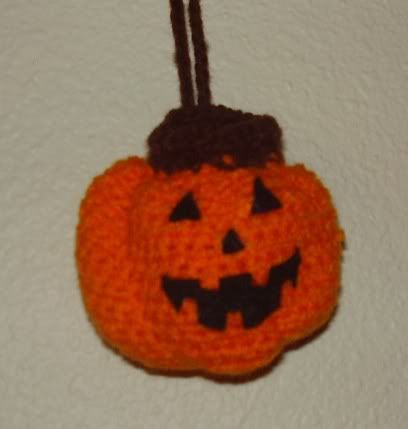
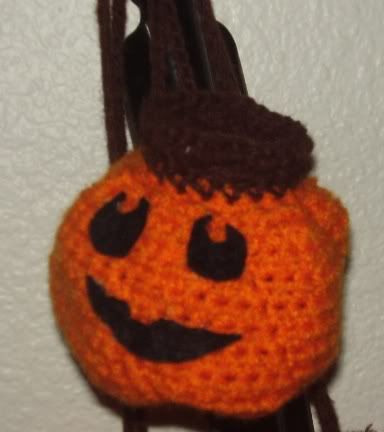
I tried to make the faces different - just so that each child that gets one has a unique gift.
Hope everyone has a Happy Halloween!
Here are my two newest creations:


I tried to make the faces different - just so that each child that gets one has a unique gift.
Hope everyone has a Happy Halloween!
Tuesday, October 19, 2010
Pumpkin Candy Bags
Hello, blog readers!
For this terrific installment, I present to you, my newest creation:
PUMPKIN CANDY BAGS!!!
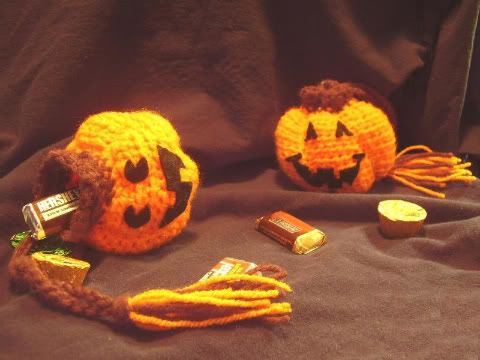
I wanted to make something special for the little boys who live across the hall at my apartment complex. They are well-behaved little munchkins ( 2 and 4 years old, respectively), and I wanted to make something just for them.
To make these bags, I had to alter the Lion Brand pattern, Amigurumi Happy Pumpkin. I think you might have to create an account on the Lion Brand web site to see the pattern, although, looking at the finished results, it's worth it.
I stopped doing the pattern after row 14, and continued as follows:
15 - sc in ea sc around
16 - add in Brown, sc in ea sc around.
17 - ch 2, sc in 2nd st from hk. *ch2, sk1, sc in next st* continue working from * to * around.
18 - sc in next st. *1 sc in ch2 sp, sc in next 2sc* (continue from * to *around). sl st in beg sc. Fasten off.
Cord:
Sc 90. Weave through loops on pumpkin stem. Tie ends together securely. Make a tassel out of A and B. Attach to cover cord join knot.
There are different ways for making tassels. How do I do it? I start by wrapping the yarn 5 times around the palm of my hand. Hold hand horizontally, with thumb sticking out. start with the yarn end at the bottom of your hand. Wind yarn around your hand 5 times, ending again at the bottom of your hand. Cut end of yarn. Then, cut yarn in half - by cutting through the strands at the bottom of your hand. Do this again with your other color.
Fold your yarn strands in half. Lay your cord on top of the yarn strands, below the folded side. Take the cut ends of the yarn, and pass it through the loop made by the folded side, over the top of the cord. Pull the cut ends tight. Voila! There's your tassel!
I found that the way I make tassels is called a 'fringe tassel.' Here is a video tutorial at YouTube to show you how:
If you prefer a more precise tassel, I found a terrific tutorial at Laughing Purple Goldfish Designs
Thanks for reading, and I hope you enjoy my pumpkins!
For this terrific installment, I present to you, my newest creation:
PUMPKIN CANDY BAGS!!!

I wanted to make something special for the little boys who live across the hall at my apartment complex. They are well-behaved little munchkins ( 2 and 4 years old, respectively), and I wanted to make something just for them.
To make these bags, I had to alter the Lion Brand pattern, Amigurumi Happy Pumpkin. I think you might have to create an account on the Lion Brand web site to see the pattern, although, looking at the finished results, it's worth it.
I stopped doing the pattern after row 14, and continued as follows:
15 - sc in ea sc around
16 - add in Brown, sc in ea sc around.
17 - ch 2, sc in 2nd st from hk. *ch2, sk1, sc in next st* continue working from * to * around.
18 - sc in next st. *1 sc in ch2 sp, sc in next 2sc* (continue from * to *around). sl st in beg sc. Fasten off.
Cord:
Sc 90. Weave through loops on pumpkin stem. Tie ends together securely. Make a tassel out of A and B. Attach to cover cord join knot.
There are different ways for making tassels. How do I do it? I start by wrapping the yarn 5 times around the palm of my hand. Hold hand horizontally, with thumb sticking out. start with the yarn end at the bottom of your hand. Wind yarn around your hand 5 times, ending again at the bottom of your hand. Cut end of yarn. Then, cut yarn in half - by cutting through the strands at the bottom of your hand. Do this again with your other color.
Fold your yarn strands in half. Lay your cord on top of the yarn strands, below the folded side. Take the cut ends of the yarn, and pass it through the loop made by the folded side, over the top of the cord. Pull the cut ends tight. Voila! There's your tassel!
I found that the way I make tassels is called a 'fringe tassel.' Here is a video tutorial at YouTube to show you how:
If you prefer a more precise tassel, I found a terrific tutorial at Laughing Purple Goldfish Designs
Thanks for reading, and I hope you enjoy my pumpkins!
Monday, October 18, 2010
How to care for acrylic paintings
I've decided to post on how to care for acrylic paintings, because I've had to offer up a couple of paintings for sale lately, and most people don't know how to properly care for a painting. I was going to write it myself, but I found a terrific guide on eHow on how to care for an acrylic painting, and thought "Why try to reinvent the wheel?"
Of course, professional framing and temperature control may be out of your league, but it is a terrific guide nonetheless!
Instructions
1. Touch the painting as little as possible. The oils and dirt on your hands can make the paint deteriorate. Wash your hands before handling the painting, and wear cotton gloves when you have to touch it.
2. Handle the painting carefully. Take off accessories like rings or bracelets so you don't nick or tear the canvas. Carry the painting by holding it on its opposite sides with both hands. Don't carry it flat on top of your open palms.
3. Have the painting professionally framed with a glass front. This is not a job you should attempt to do yourself. The glass will help protect it from dust, dirt and moisture.
4. Store or display the painting in a place that is below room temperature. The top film on acrylic paint is already soft; keeping the painting at room temperature will further soften it. Install a thermostat in the room where the canvas is kept and monitor it daily.
5. Hang the painting where it will be best preserved. Don't place a painting over a fireplace mantel: The soot and heat can damage it. Even in non-wood fireplaces, you have the problem of a chimney conducting drafts and dampness into the room.
6. Keep the painting away from sources of heat, ultraviolet light, direct sunlight, dust, dampness and humidity. These elements can hasten the natural aging process of the paint and cause damage like prematurely faded colors or cracks.
7. Have a professional hang the painting. This means either placing a loop on either side of the top of the frame and suspending it with wire, or securing a wire to the back of the painting with a screw on either side. Don't hang the picture on a nail, because as the canvas weakens with age, the nail can push its way into it and dent the surface.
8. Periodically check the frame's hardware. Are the screws or wires loose? Is the frame coming unglued? Is the glass shifting within the frame? It's better to check and catch a loose wire than to come home and find a ripped painting because the glass front broke when it fell to the floor.
How to Care for Acrylic Paintings on eHow.com
When I give an acrylic painting as a gift, I usually keep it simple:
1. Don't put the painting in a hot or humid place - the humidity can cause the paint to warp; the heat can make it soft and pliable, and more prone to damage.
2. Don't put it in a really cold place - the paint can crack.
3. Don't put it in direct sunlight - the paint will fade
4. If you need to clean it, use a dry cloth - again, dampness can degrade the paint.
5. Handle the painting carefully, touch it as little as possible...and wash your hands before you touch it, as skin oils attract dirt and dust, as well as accelerate the aging process of the paint.
Take good care of your acrylic paintings!
Of course, professional framing and temperature control may be out of your league, but it is a terrific guide nonetheless!
Instructions
1. Touch the painting as little as possible. The oils and dirt on your hands can make the paint deteriorate. Wash your hands before handling the painting, and wear cotton gloves when you have to touch it.
2. Handle the painting carefully. Take off accessories like rings or bracelets so you don't nick or tear the canvas. Carry the painting by holding it on its opposite sides with both hands. Don't carry it flat on top of your open palms.
3. Have the painting professionally framed with a glass front. This is not a job you should attempt to do yourself. The glass will help protect it from dust, dirt and moisture.
4. Store or display the painting in a place that is below room temperature. The top film on acrylic paint is already soft; keeping the painting at room temperature will further soften it. Install a thermostat in the room where the canvas is kept and monitor it daily.
5. Hang the painting where it will be best preserved. Don't place a painting over a fireplace mantel: The soot and heat can damage it. Even in non-wood fireplaces, you have the problem of a chimney conducting drafts and dampness into the room.
6. Keep the painting away from sources of heat, ultraviolet light, direct sunlight, dust, dampness and humidity. These elements can hasten the natural aging process of the paint and cause damage like prematurely faded colors or cracks.
7. Have a professional hang the painting. This means either placing a loop on either side of the top of the frame and suspending it with wire, or securing a wire to the back of the painting with a screw on either side. Don't hang the picture on a nail, because as the canvas weakens with age, the nail can push its way into it and dent the surface.
8. Periodically check the frame's hardware. Are the screws or wires loose? Is the frame coming unglued? Is the glass shifting within the frame? It's better to check and catch a loose wire than to come home and find a ripped painting because the glass front broke when it fell to the floor.
How to Care for Acrylic Paintings on eHow.com
When I give an acrylic painting as a gift, I usually keep it simple:
1. Don't put the painting in a hot or humid place - the humidity can cause the paint to warp; the heat can make it soft and pliable, and more prone to damage.
2. Don't put it in a really cold place - the paint can crack.
3. Don't put it in direct sunlight - the paint will fade
4. If you need to clean it, use a dry cloth - again, dampness can degrade the paint.
5. Handle the painting carefully, touch it as little as possible...and wash your hands before you touch it, as skin oils attract dirt and dust, as well as accelerate the aging process of the paint.
Take good care of your acrylic paintings!
Wednesday, October 13, 2010
Crochet Edging for Blue Jeans - Revisited
Remember when I said that I would post a picture when the edging was sewn onto the blue jeans? Well, here ya go:
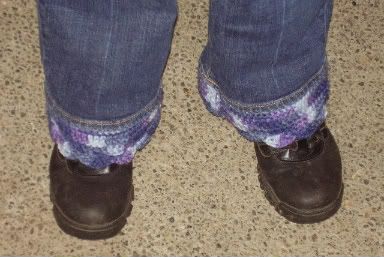
This is me, wearing the jeans. Sweet!
When I wore them, I got several compliments - "boy, I wish I could crochet!" and " Did you do that yourself?! Cool!" among others.
I want to give a shout-out to my awesome friend Bert, who sewed on the edging for me: I couldn't have done it without you! Thanks!

This is me, wearing the jeans. Sweet!
When I wore them, I got several compliments - "boy, I wish I could crochet!" and " Did you do that yourself?! Cool!" among others.
I want to give a shout-out to my awesome friend Bert, who sewed on the edging for me: I couldn't have done it without you! Thanks!
Subscribe to:
Posts (Atom)