Showing posts with label crafts. Show all posts

Saturday, May 14, 2011

Small Purse Bag

This little "purse bag" was something that came to me when I was brainstorming for more imaginative items for my upcoming store:

Photobucket

As expected, the more jewelry findings, clasps, fringe and decorative beads I have to use, the more it will cost. But these little bags will probably sell around $6-$10...that won't even *bend* a budget, much less break it.

In the future, once I have the patterns perfected, I'll start to offer bags made using tapestry crochet.
I've also thought about making some more of those terrific, horrific, eyeball key chains, and offering those for sale as well. In case you've forgotten what they look like:

Photobucket
The eyeballs will probably go for about $10 each, because they're *really* time-consuming. All of those little veins on the surface of the eyeball have to be hand-embroidered!

I have been thinking about stopping the practice of importing these posts as notes on Facebook - because all the comments and/or discussion usually end up on Facebook - not here on blogger, where the most value could be gleaned from it. You don't even need to sign up with blogger to leave a comment.

Thanks, you guys, for reading - please feel free to comment on what you'd like to see in the store!

Wednesday, May 11, 2011

Bright Red Small Drawstring Bag

As I may have mentioned before, I'm thinking of starting a small crochet/art business on etsy this fall. I've been working on experimenting with different techniques to create small drawstring bags that are affordable, relatively simple in design, and can be altered easily for finishing touches, such as decorative beads and clasps. The patterns that I create also have to translate well to different types of yarn.

Here is my first bag:

Photobucket


It's made out of bright red worsted weight yarn using an H hook. It's big enough to fit the palm of my hand – the perfect place for a key, change, lipstick, or a special keepsake. Let your imagination run wild!

Monday, December 27, 2010

Melting Snowman Amigurumi

I was looking for something to make a friend of mine for a Holiday gift - because I like handmade things, she likes handmade things...and, well, I'm cheap. I just bought a house and I need money for the improvements - give me a darn break, already!

When I found the pattern for this project, I really loved it - and I thought she would get a kick out of it, too. There is a story behind this gift, though, and you'll have to live through the story before I'll allow you to see the awesome amigurumi that I made :

My friend is 81 years old. She lives in a 55+ community, and every year, they have a craft/hobby fair. She bought a badly made snowman from a lady because she felt sorry for her. The snowman had a WHITE scarf (really - a white scarf on a snowman), and it's arms were jutting haphazardly out of it's hips. Needless to say, this poor snowman looked like he suffered an industrial accident. So - her and a mutual friend of ours, Sarah, went to JoAnn's Craft and Fabric store, and picked out a bunch of decorative stuff to hopefully fix the train wreck that was this poor snowman.

It didn't work. It's an inside joke now, something to poke fun and laugh at - that silly deformed snowman. So - in honor of that poor, deformed snowman, I made this:

Photobucket

It's a melted snowman!

I found the pattern here, at Fun and Fang, if you would like to pick up your hook and make one of your own.

Hope you're all doing well, having a great holiday season - and staying warm!

Thursday, December 23, 2010

Fan Light Pull

A few days ago, my husband expressed frustration when trying to find the light pull on a fan in our house. As you may know, this house is new to us - but it was built in 1972, and has changed a few hands over the years. The previous owners weren't too handy around the house...they half-assed repair jobs, and they sure as heck didn't leave us anything they didn't have to. The light and fan pulls are both short - so they're pretty hard to find in the dark.
So, I came up with this solution, after sifting through my art stuff for about 15 minutes:
Fan Light Pull Cord
I've had the green pendant for a while now - I suspect I found it on one of our family's yard-sale excursions when I was a teenager. I got the fake pearls at our local JoAnn's Crafts store. I attached the pendant to a length of craft wire, then threaded on the beads. I weaved the craft wire around the existing fan light pull, and VOILA! A new, sexy fan light pull. Well, maybe not sexy, but it is pretty stinkin' cool, if I do say so myself. :)

Tuesday, December 21, 2010

Crochet Bell Necklaces for Wooden Deer

My dad made me these awesome wooden deer years ago, and I haven't had much of a place to put them until now. So, I decided to pull them out and make them festive this year.

Wooden Deer

I bought some big bells at my local JoAnn's Craft store, and then scoured my yarn stash for the right shades of red and green. I made a cord, using this method ( I used technique 2) , and threaded the bell on when I thought that I was halfway done. I left a few inches on the end of each thread, and tied them around the necks of the deer. Cool huh?

I'm so crafty, I amaze myself sometimes! :D

Friday, December 10, 2010

Skull Tapestry Crochet Bag

I know it's been a while, but here is my latest project:

Photobucket

This purse is piratastic! I'm artistic, so I can just make up words. I'm cool like that.
I've done tapestry crochet previously, but never this intense, and never on anything that I would willingly carry around in public. But this...is just all kinds of awesome.
The pattern for the handbag is at futuregirl's site: Starling Handbag
The skull motif is here, at CraftyCrafty: Jolly Roger Skull and Crossbone
I've put a picture of my handbag on the Starling Handbag Flickr Pool - it's great to see what other crocheters out there are creating with the same pattern!

I even have an order in...for one with a red skull, so stay tuned for that one!
Also, I have a set of crochet dice to make, as well as a gift for a friend's daughter.
I'm *this close* to finishing a hat that I'm going to be donating to a homeless shelter, along with three other hats I've made that never get worn. So - that's what I'm doing these days. Well, that, and managing to get all the REGULAR chores done while unpacking boxes in our NEW HOUSE! Woohoo!

See? I told you I might check in!

Tuesday, October 26, 2010

Howling Wolf Carved Pumpkin

I've always wanted to carve a howling wolf into my pumpkin. This year, I decided to finally do it, after I considered and rejected several other pumpkin designs (Among the contenders: Jack Rackham's jolly roger with crossed cutlasses, and a simple, elegant grim reaper). Next year, when we get our own house, I can carve to my heart's content, but living in an apartment has special challenges, namely the lack of space. The wild, roving packs of rabid kids that are native to this area are also an annoyance. They love to steal things, smash things, make noise, etc. I could only imagine what horrible fate will befall my pumpkin when I leave it out on Halloween night while I go to my awesome friend's Halloween party. Oh, well - I guess that's one way to learn impermanence.

Without further ado, here is my fabulous carved pumpkin:

pumpkin carving howling wolf

I hope everyone enjoys a safe and Happy Halloween!

Tuesday, October 19, 2010

Pumpkin Candy Bags

Hello, blog readers!
For this terrific installment, I present to you, my newest creation:

PUMPKIN CANDY BAGS!!!


Photobucket

I wanted to make something special for the little boys who live across the hall at my apartment complex. They are well-behaved little munchkins ( 2 and 4 years old, respectively), and I wanted to make something just for them.

To make these bags, I had to alter the Lion Brand pattern, Amigurumi Happy Pumpkin. I think you might have to create an account on the Lion Brand web site to see the pattern, although, looking at the finished results, it's worth it.
I stopped doing the pattern after row 14, and continued as follows:
15 - sc in ea sc around
16 - add in Brown, sc in ea sc around.
17 - ch 2, sc in 2nd st from hk. *ch2, sk1, sc in next st* continue working from * to * around.
18 - sc in next st. *1 sc in ch2 sp, sc in next 2sc* (continue from * to *around). sl st in beg sc. Fasten off.

Cord:
Sc 90. Weave through loops on pumpkin stem. Tie ends together securely. Make a tassel out of A and B. Attach to cover cord join knot.

There are different ways for making tassels. How do I do it? I start by wrapping the yarn 5 times around the palm of my hand. Hold hand horizontally, with thumb sticking out. start with the yarn end at the bottom of your hand. Wind yarn around your hand 5 times, ending again at the bottom of your hand. Cut end of yarn. Then, cut yarn in half - by cutting through the strands at the bottom of your hand. Do this again with your other color.
Fold your yarn strands in half. Lay your cord on top of the yarn strands, below the folded side. Take the cut ends of the yarn, and pass it through the loop made by the folded side, over the top of the cord. Pull the cut ends tight. Voila! There's your tassel!
I found that the way I make tassels is called a 'fringe tassel.' Here is a video tutorial at YouTube to show you how:


If you prefer a more precise tassel, I found a terrific tutorial at Laughing Purple Goldfish Designs

Thanks for reading, and I hope you enjoy my pumpkins!

Wednesday, October 13, 2010

Crochet Edging for Blue Jeans - Revisited

Remember when I said that I would post a picture when the edging was sewn onto the blue jeans? Well, here ya go:

Photobucket
This is me, wearing the jeans. Sweet!

When I wore them, I got several compliments - "boy, I wish I could crochet!" and " Did you do that yourself?! Cool!" among others.

I want to give a shout-out to my awesome friend Bert, who sewed on the edging for me: I couldn't have done it without you! Thanks!

Saturday, October 9, 2010

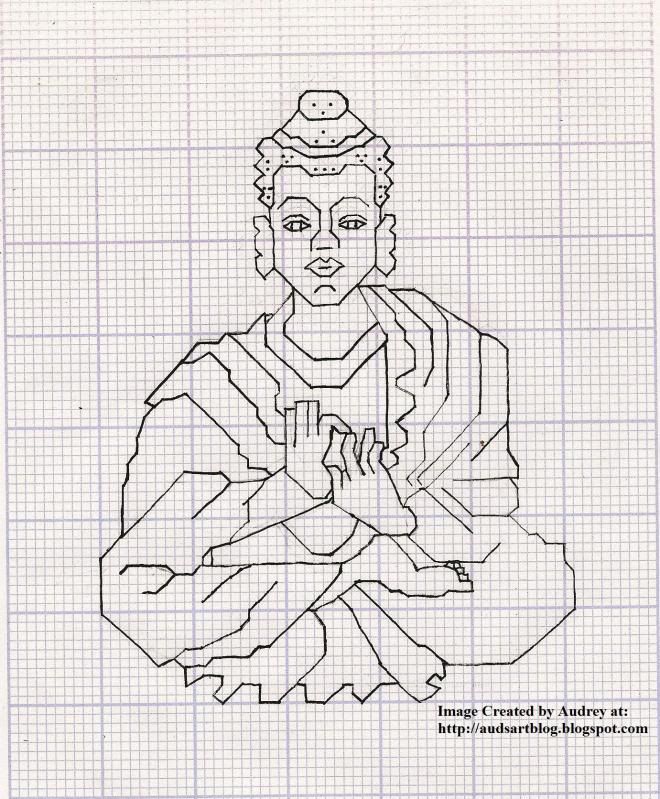
Buddha Cross Stitch Pattern

I was looking around on the internet for a simple, FREE Buddha cross-stitch pattern to do, as a form of mindful meditation. Mindful meditation must be expensive these days, because I looked high and low and couldn't find a simple pattern. Not only could I not find a simple pattern, but I was unable to find a Buddha cross stitch that I didn't have to pay an arm and a leg for. So - I decided to fill this niche. I found a few drawings and pictures of statues, and started to play around and be creative with them. This is the result:
Photobucket

This image is, of course, altered, so as to fit the frames of my blog - I do that with most, if not all of the images that I post here, to offer you, the blog reader, a more pleasant viewing experience. Here is the URL for the original, at Photobucket.

I hope you enjoy this creation - it was fun to make! I have yet to cross-stitch it, but that will be another entry for another day. If YOU find this and cross-stitch it, feel free to link to my blog - I would love to see your finished product!
A Note - if you wish to post this image elsewhere, make sure to give credit where credit is due: attribute it to me! In the spirit of the Dharma, I have decided to make this pattern free; use this anywhere and for whatever purpose you like.
I may, in the future, add color and charge a fee for the colored pattern. But for now...enjoy it as it is.

"Do not dwell in the past, do not dream of the future, concentrate the mind on the present moment." ~Buddha

Friday, July 16, 2010

A Gift Basket for the newlyweds!

Here is a gift basket that I put together for a couple of my friends, Dan and Brianne, who've just gotten married and moved into their first apartment. Unfortunately, they live 2 hours away, and have yet to receive it, but I made sure that anything in the basket would be welcomed as a duplicate. We could all have used a backup set of measuring spoons/cups at one time in our lives, right?!

Photobucket

Awww...how beautiful! This basket includes my homemade towel toppers, some homemade strawberry jam, a couple of coffee cups, spatulas, an oven mitt, chip clips, and other assorted kitchen goodies. Black and red are the colors that Bree said she would like in her kitchen, and I tried to get as many things in black and red as I could. Honestly, I think I should get bonus points for stuff I found that is both black AND red. :D

Both of them are terrific friends...I wish them a happy, love-filled marriage. They bring out the best in one another. *glass clink* CHEERS!

Thursday, April 2, 2009

A Yule Thing that I forgot to post...

This wasn't the first wreath that I ever made - but it sure is the most awesome one!
Believe it or not, I found a synthetic (plastic and wire) wreath in the garbage at my apartment complex and fished it out. I fluffed it back up, attached some tiny pine cones with craft wire, and bought some ribbon and plastic poinsettias for less than $5. I made a beautiful bow with the ribbon, wrapped a length of ribbon around the wreath, added the poinsettias, and VOILA! A beautiful wreath.

Photobucket

It made me feel so good to finish this project! It was mostly good 'ol elbow grease that got this one done!